August 2020 / Mainly Marta :: A Motherhood + Lifestyle Blog

SLIDER

Welcome

What started as a digital diary to document a newfound journey as a stay at home mom / wife has quickly evolved into my own little corner on the internet where I share all that life brings my way -- the good, the bad, and everything in between. Thanks for stopping by; I hope you stay awhile!

8.31.2020

Playroom Reveal


Hey loves! So excited to finally be sharing our playroom with you guys! This has been in the making for MONTHS and I feel like it's finally complete enough to the point where I can share it with you! I'm still eyeing + searching for more pieces, but I just cannot wait any longer to share. I've had so much fun dreaming up this space, searching for items, and bringing that dream to life.

As always, I'll have a list of products linked down below just in case you want to snag something for your space. I'll also have a list of "coveted" products that I'm keeping an eye on -- waiting for a price reduction or searching for a dupe / something similar.  


Before


Annnnnd, The Refresh! 


*paint colors from Behr / all bought at Home Depot 

Products

Rug

Chalkboards 

Weather Station

Wooden Plates -- my dad bought these in Romania twelve years ago. 

Rainbow Stacker

Mini Globe -- bought three years ago from Marshalls.

Plants 

Nugget Comfort Couch -- we bought two in the color beanstalk

Table and Chairs -- thrifted + painted by us, but I've linked the original shop.
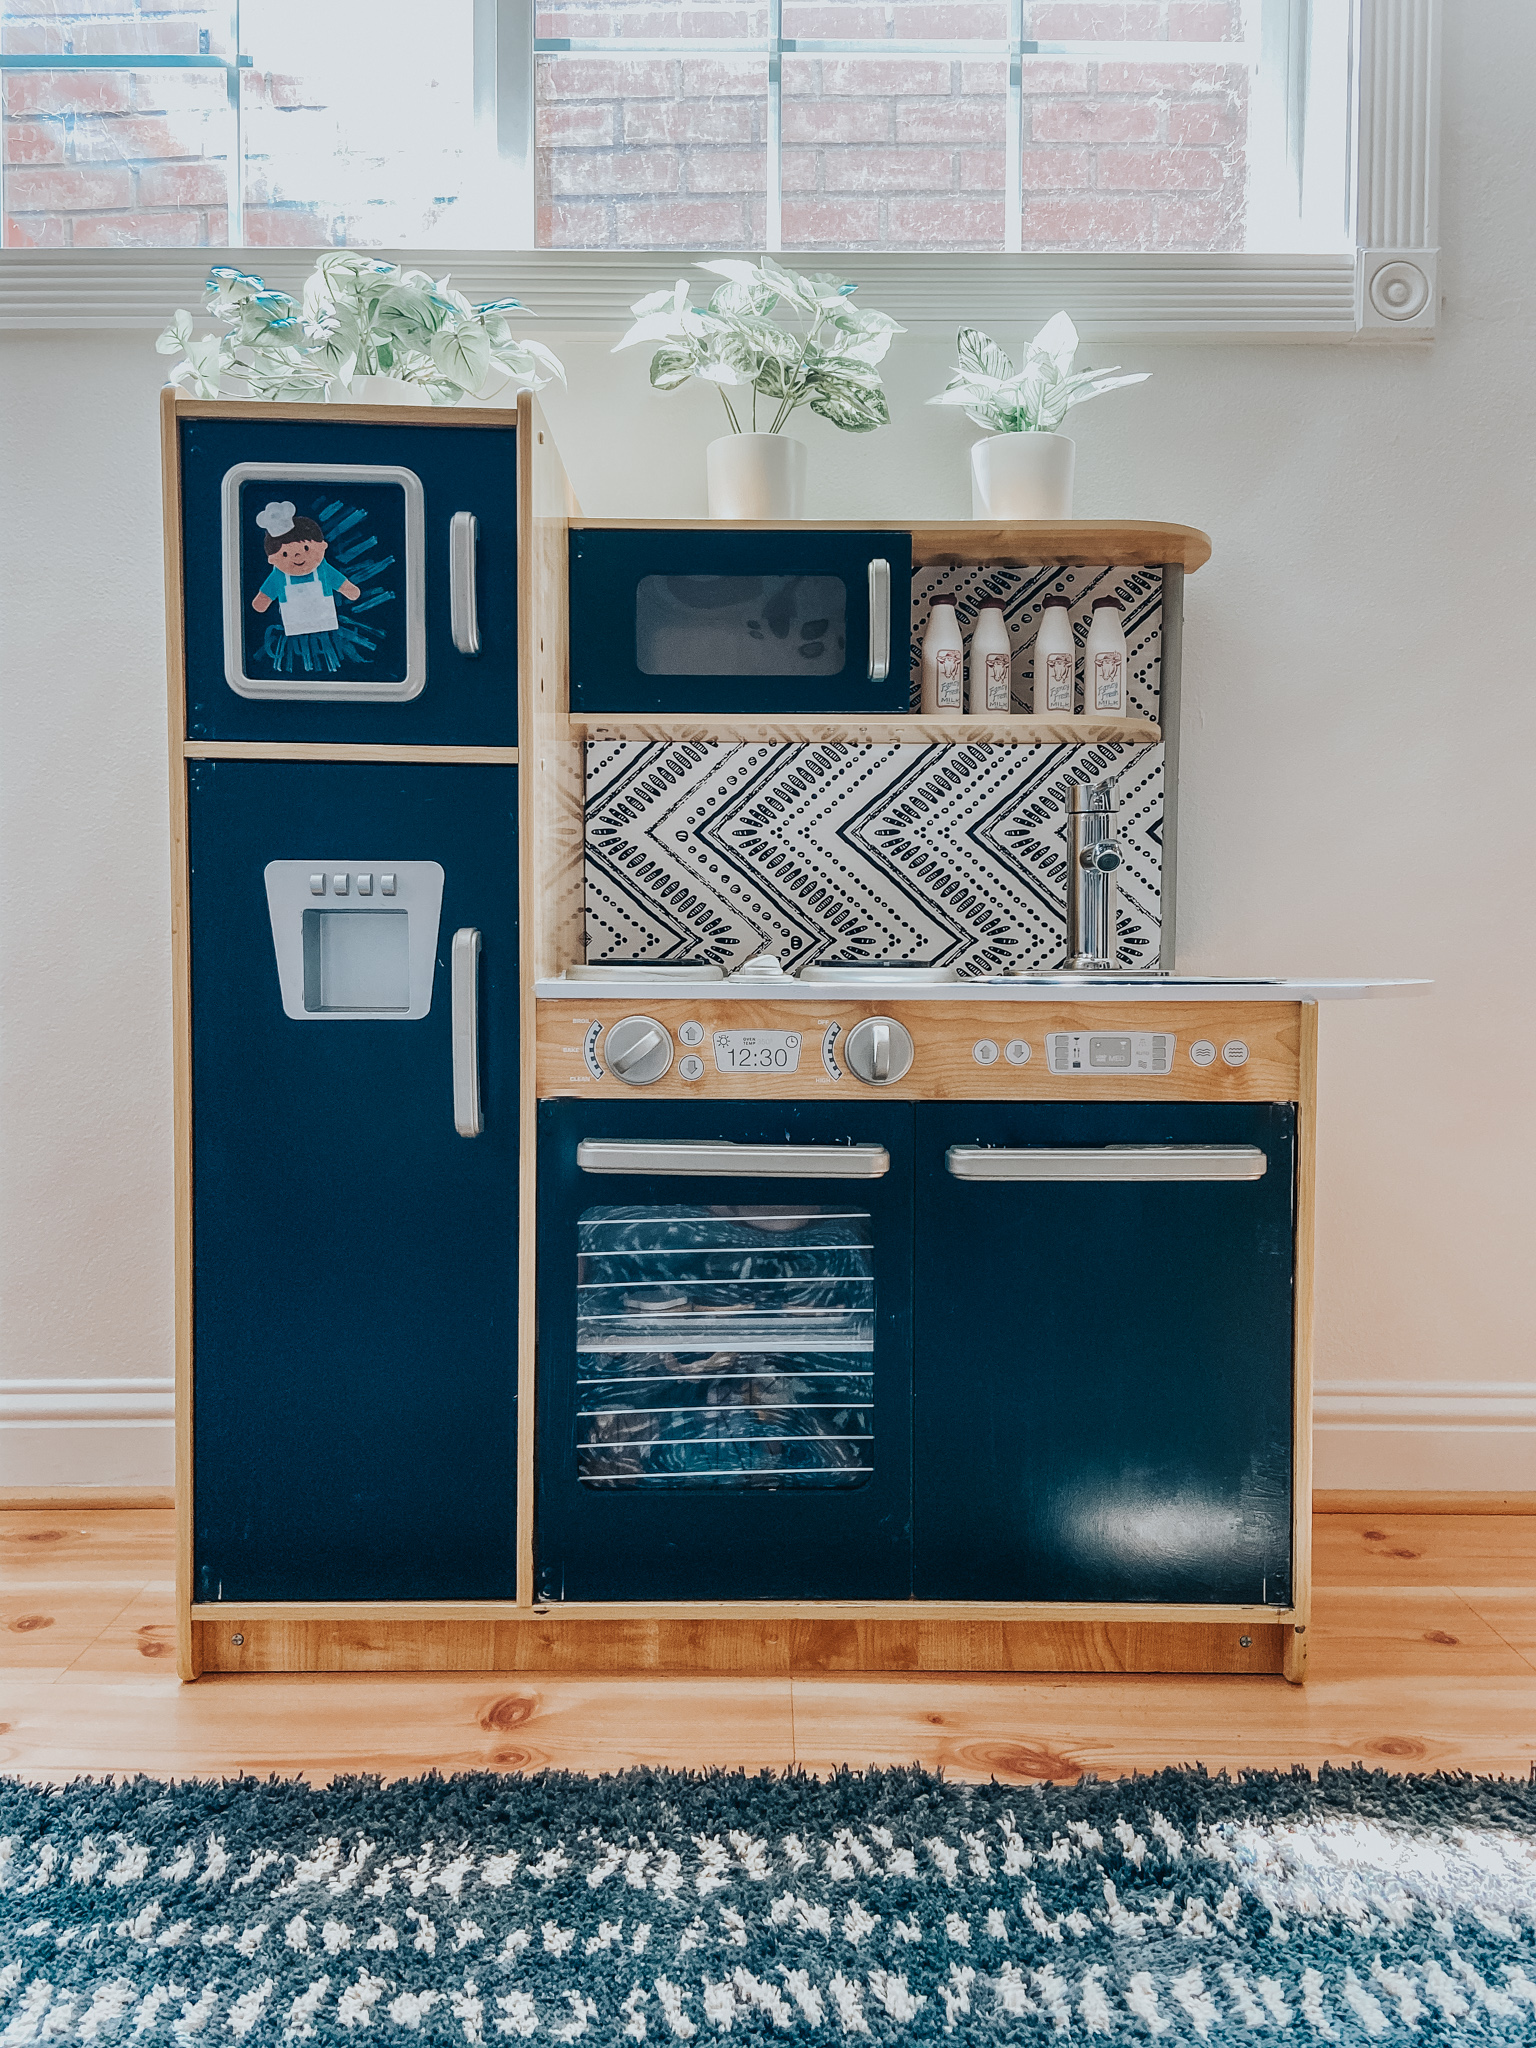
Play Kitchen -- revamped by us :: read about that here.

Little Alarm Clock -- from HomeGoods

Cabinet -- we diy(ed) this by buying a bookcase + doors & then painted doors to match the play kitchen. 

Mini Painted Ceramic Plates -- also bought by my dad in Romania

Farmer's Market -- also revamped by us :: read about that here.

Dollhouse -- painted by us; inside revamp + furnishing coming soon!


& there you have it -- that's our playroom! 

we are having tons of fun playing and making memories here. Now that the room is finally done, I can't wait for November to roll around so I can start decorating for Christmas! I'm thinking of turning the farmer's market into a bakery because you know this mama loves decorating and then redecorating! I'll keep you guys posted as the seasons come and the room gets little spruces, mini refreshes, and so forth. Thanks for following along!

8.30.2020

simple side dish | mini greek bliss


today, I'm sharing a super simple tasty side salad that is always a hit at our house! 
you can whip this up in 5 minutes and pair it with whatever you've got on your plate as this goes great with all kinds of meat and potatoes.  

you'll need:

- cherry tomatoes; halved.⁣
- kalamata olives; pitted.⁣
- onion; diced. ⁣
- feta cheese; crumbled. ⁣


to make the dressing

- olive oil.⁣
- red wine vinegar.⁣
- pinch of dried basil. ⁣
- garlic + herb seasoning. ⁣
- pinch of salt and pepper. ⁣

ya'll so simple and so yummy. ⁣

a little note: 
I am what you'd call an eye baller when it comes to certain recipes -- especially salads. I am also known to impulsively toss in an ingredient to a dish because I think I'll enhance it. Basically, I will just toss stuff in until it tastes + looks good enough -- so no measurements / quantities are available for this recipe. I am leaving it all up to you, the maker's discretion & taste buds.  


No comments

8.25.2020

Recipe | Peach Berry Cobbler

Hi friends, today I'm sharing one of my favorite late-summer desserts: peach berry cobbler. This past week I made three of them -- one for us and two for family members and y'all they were a hit! I've had several of you ask for the recipe when I posted to my Instagram stories, so I thought it'd be fun to document the process via the blog while sharing the recipe and getting my little guys to help. 

This dessert is loaded with seasonal berries and fruit which makes it the perfect option for even the healthiest of eaters. I also love this recipe because it's quick and simple -- the perfect recipe for an action-packed day. 

Below, I've listed ingredients as well as step by step instructions paired with pictures of the process. At the end, you'll find a recipe sheet that you can pin, save, and print. so, let's get baking! 


What You'll Need

Betty Crocker Super Moist Vanilla Cake Mix

1 box

Eggs

3

Canola Oil 

1/2 cup 

Cold Water 

1 cup 

Peaches

3 to 4; whole, pitted + skinned, thinly sliced

Flour

1 cup

Seasonal Berries 

3 to 5 cups; as desired

blueberries, strawberries, raspberries, blackberries all go great with this recipe. 


+++++++ Prep Time: 10 mins ++++++++ Bake Time: 30 to 45 Mins +++++++


How To Make 

Step One. 
set oven to 350 degrees Fahrenheit. 
grease pan with butter or cooking spray. 


Step Two. 
empty cake mix into a large bowl.
add eggs, oil, and cold water.
mix until smooth.
set aside. 


Step Three. 
wash, pit, and peel peaches. 
thinly slice them and place a layer on the bottom of the pan. 
sprinkle a handful of flour on top of peaches.


Step Four. 
rinse and strain berries. 
layer them on top of the peaches. 
sprinkle a handful of flour on the berries. 


Step Five. 
add batter to the pan. 


Step Six.
evenly spread the batter to cover the fruit. 
then, add a layer of sliced peaches on top of the batter. 


Step Seven.
place into the oven for 35 to 40 minutes.
when the outer crust is brown, take a fork to the middle of cobbler.
if the fork comes out clean, your cobbler is done. 
if batter sticks to the fork, leave another 10 minutes.
repeat the process until the fork comes out clean. 

Step Eight. 
take cobbler out of the oven.
sprinkle powdered sugar on top. 


Step Nine. 
serve hot with a scoop of vanilla ice cream. 
or let the cobbler cool off & top with fresh fruit + whipped cream. 
but most importantly, enjoy it! 

Some Tips 

about the flour -- if you're wondering why I'm always sprinkling it on the fruit, its to soak up some of the fruit juice as it's baking. no one likes a soggy cobbler, am I right? 

berries not in season -- one thing I love about this recipe is that berries and peaches don't have to be in season to make it. frozen fruit works great! just remember to rinse the ice off the fruit and use pieces that aren't frozen into big clumps. 

get creative -- with the top layer design, with the ingredients, and with how you serve it. drizzle some jam, sprinkle some granola on top for some crunch; there is always room for an extra dash of cinnamon. the possibilities really are endless! 


8.03.2020

DIY | KidKraft Uptown Play Kitchen Makeover


Hi Friends!

Today I want to share our play kitchen makeover -- I shared my grocery story turned farmer's market last month (read that here) and now it's time to reveal the play kitchen!  The kitchen was in pretty good condition but the faucet fell apart from the constant rough play -- my little guys love pretending to wash dishes. Another thing that drove me crazy was the fact that the play kitchen didn't have a full backsplash. Our play dishes and utensils would find their way behind the kitchen and the boys would try to pull the kitchen to retrieve them. 

So with that in mind, I set off to give it a makeover. I wanted the kitchen to match the playroom as well as the farmer's market. I have a KidKraft Uptown Play Kitchen we gifted Felix for his first Christmas and the goal was to give it a modern refresh. Here's what the kitchen looked like before. 


So, to start I had my husband unscrew all the doors and stove burners on the play kitchen. We painted the doors with the paint colors I had chosen (from Home Depot) to paint a table and chair set we got off of craigslist list.  I also went to Micheal's and got some spray paint to paint all the handles of the kitchen as well as give the stove burners a refresh. 


I chose these Behr paint colors because I wanted earthy tones to compliment our Nugget comfort couch that's coming in September. I want the whole playroom to give off an earthy vibe. Something that's not going to make your head hurt the moment you walk in. I also wanted colors that would look great in pictures as the boys spend a lot of time in the playroom and spontaneous pictures are a lot easier if the things in the backdrop aren't loud and too colorful. 

I didn't take too many pictures of the painting process as I was out with the kids while my husband painted all doors and handles, but he managed to send me these shots of the handles and knobs (stove burners not pictured because I spray painted them beforehand to see the color. 


So, after we painted all the things, I went searching for the backsplash and new faucet materials. I started by reading a lot of blog posts on what to do regarding a backsplash. While there was a TON of people to gave the IKEA play kitchen a mini revamp, I couldn't find anyone who refreshed an Uptown KidKraft Play Kitchen!

I decided that since I didn't have a full backsplash, I had to make my own.  I went to Amazon and purchased two plastic boards + a $9 modern wallpaper roll with a print that I thought would compliment the new kitchen colors. I also wanted something that I didn't need to glue, so the wallpaper I was looking for had to be a peel & stick. 

Then I moved on to researching faucet replacement ideas and fell short. KidKraft didn't have it listed as an option on their replacement part. I couldn't find a seller that made them. I even looked into other brands like IKEA, but found nothing that made any sense. The DIY ones looked so tackey, so I went to Amazon and found a modern-looking faucet that didn't break the bank and purchased it. 


Once everything came in the mail, it was time to install it all. My husband screwed back on all the doors and we took the current backsplash and stuck the wallpaper on it as well as measured how much board would be needed to stick underneath the shelf unit to continue the backsplash -- no pictures of this because it was messy and stressful. Luckily, I bought a set of two because I can't cut straight to save my life. I had my husband come to save the day (... like he always does)! 

After the backsplash was done, we super glued the faucet to the kitchen and it was a whole new world! 


Isn't it just so much better? I am loving how it turned out. I'm going to put some fake plants in white pots on the top and then change up the decor as the seasons change -- so I'll be sure to share those with you guys as well!

↓ S H A R E ●  S A V E ●  P I N  ↓


No comments
© Mainly Marta :: A Motherhood + Lifestyle Blog • Theme by Maira G.